
This was my most recent kirtle I created. This kirtle probly fits me the best od the ones I currently have. My husband help to sew up the back on me so I could get the front and side seams. The material was a mid weight silky fabric (rayon blend ~ I cannot afford real silk). This kirtle is backlaced, it is not lined, but will be. I made this kirtle in a day's time, day before the event I wore it to. obviously it is machine sewn. There is a wide scoop neck in both the front and the back, the hem is aproxmently 3 inches on the floor.
Constuction
I used the curved front seam method (see the link in a earlier kirtle post) The cutting method I used is below (I had 4 yards for this kirtle, I will explain more in a later post)
 After I had cut out my basic pattern according to my measurements plus 2", I pinned the right sides together along the seams and put it on inside out. Then I had my husband literaly sew up the back seam to fit my curves along the back. Then I was able to adjust the rest of the seams as needed to get the fit I needed. I maked all the seams, and then cut the basting (sewing) along the back.
I cut of the extra fabric along the marked seams, leaving a 1/2'' seam allowance, except where the back lacing was to be (which was 2") I then added a couple layers of scrap muslin to the back seams. I folded the green layer over twice (no raw egdes) leaving me with a 1/2" wide strip with several layers.

I then stiched the rest of the seams, including adding the sleeves. I made some lace holes (unfinished) and and laced up the kirtle, then I tried it on, laced it up, to see where I needed to adjust my side and front seams. I took it off, re-stitched what I needed, and repeat, and repeat several times until I was mostly happy with the fit. (the bodice still puckers to much, but a lining will help that)
Then I hemed the neck, wrists, and hem and I was ready to go....
Future construction
I will be lining this kirtle and finishing the inside seams (they are currently raw) I also will be hand sewing eyelets for the laceing, and I have some pretty trim I want to add to the neck and wrists. I may create a gaurd or embroder the bottom of the kirtle to match the trim. I plan to use this as my good kirtle under some of my court garb.
Notes, thoughts, observances
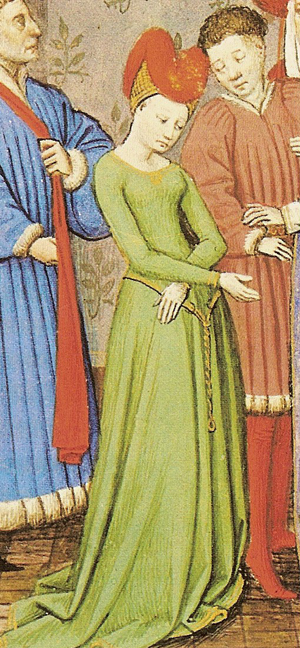
The sleeves are a bit tight. This picture was taken at the end of the event after the fabric had relaxed, so it shows more wrinkling in the bust, that was not there at the start. (my belt also is pulling on the gown causeing wrinkles below the bust) The back was a bit to low to wear the current smock or underdress I have, So I ended up wearing a white cotton spagetti tank, and leggings instead. (I'll have go get going on a new smock soon anyways) This dress also had a lot of static by the end of the day, having a lining and a proper underdress would help this. This dress breaths very well, did not keep me warm at all when wearing it. Diddo with the lining and proper undergarments.
What I will be fixing
Besides the future construction, I will be fixing the bodice more to get rid of the wrinkles, and take in the seams just a tad more. Will not be able to lace up all he way until I have worn it a bit (15 to 20 min), but then it will still fit right after the fabris relaxes. I might try to let out the seams in the sleeves about 1/4'' to help reduce the tightness.
What is period about it???
Well this kirtle has a simular shape to many kirtles found throughout europe durring the middle ages. It has a simular color to the gown below also. It has been worn before being completely finished, Which I am told by one of the laurels I know is very period.
 What isn't period about it???
 It is machine sewn, it uses a modern fabric, The fabric was much wider, so I didn't use period cutting techniques. The gown is very plain, Most midieval kirtles/gowns that would be made of silk (since this is the type of fabric represents silk) would also have some trim, bling or embroderiry to it.
No comments:
Post a Comment